Showing posts with label projects. Show all posts

Monday, April 17, 2023

Purl Soho KAL, Prism Blanket

I finished the blanket a couple weeks ago but I so love the process - there's no sewing! - that I'm using the scraps from this blanket and a bunch of other knitting projects to make a baby blanket with smaller squares.  I hope to find cute flannel fabric to sew onto the back to make it super cozy.  Here's what it's looking like so far...

You guys, there's no sewing!


Sunday, December 19, 2021

Project: Arbor Blanket

This picture was taken a couple months ago near the start of the Arbor Blanket project.  It took me three months working intermittently to finish.  There was only the one cone of organic cotton fiber and I got to watch it s l o w l y reduce in size, but there's a surprising amount left.  Perhaps I can make a cotton hand towel for the kitchen?  Anyway, the final stitch count is 96,782.  It is by far the highest stitch count of any project to date.  

Tuesday, December 15, 2020

Shrinky Dink Christmas Ornaments

Featuring characters from some of our favorite picture books
(from left to right) Hippos Go Berserk, The Duckling Gets a Cookie, and The Adventures of Beekle


Saturday, April 14, 2018

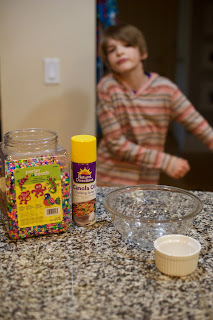
Perler bead bowl

With an oven-safe bowl, cooking oil, a paper towel, perler beads, and an oven, you can make yourself a fun bowl on a weekend afternoon when your little one is bored. 


Thursday, November 27, 2014

Wednesday, November 26, 2014

Thanksgiving break sleepover with Cousin Mia

When we learned Cousin Mia had the week of Thanksgiving off we quickly made arrangements to get her to the condo. Over the course of two days the kids created a science lab in the hallway (complete with a roving tarantula*, an air plant, cacti, faux lizards, insects, and a ladybug, and a motion detector), completed three projects - snowmen art made with feet prints, fingerprint turkeys, and bird feeders. We also spent approximately four hours at Playdate PDX. The kids seemed to particularly enjoy shooting foam balls at me. Did I mention the trip downtown to get donuts and the trip to Division for ice cream because we also did that. And the kids practiced the art of photo bombing. At one point I overheard Hen saying (repeatedly) "I don't want you to leave." When Mia asked him why he responded with, "Because I'm having too much fun!"

Of course there were pictures…
Blue Star = yum

Playdate PDX = fun

white paint being applied to the bottoms of feet = ticklish

photobomb = laughter

bird seed, peanut butter, and a toilet roll = feeder
For the full set of pics, head on over to Flickr.

What we learned about Mia during her stay:
  1. Her feet are very ticklish. She almost fell into the tub when we were doing our snowman project.
  2. The girl loves peanut butter. We'll be getting her a big jar of Jif for Christmas.
  3. She is a schemer. I mean, sure, Brother Nick told me to keep my eye on her but I had no idea. On the car ride to the condo after picking her up, she started whispering her devilish plans to Hen. When confronted, she came up with a clearly not honest cover story. Hen finally spilled the beans when I turned the car around and told the kids I would take Mia back home if they weren't honest with me. (Little farts.)
  4. The girl is beyond social. During the operating hours of the Science Lab, she had no fear asking our neighbors, nay, demanding, they come to see all the science they had. 
  5. She is fun. And into girly things. But wasn't so rigid that she couldn't enjoy Hen's Let It Go song that talks about killing a snowman. 
  6. She and Hen play well together, both are generally agreeable and willing to compromise.

*The faux tarantula was constantly escaping his cage and hiding in the condo. We may never know (Mia did it) how he got around (it was Mia) so much (Mia helped) or why he chose to head back in to the condo (all Mia), but we're glad he stuck around.

Thursday, July 17, 2014

Shrinky dinks, SHRINKY DINKS!

Hen has discoverd Pokemon and Shrinky Dinks and is having a fantastic time making Shrinky Dink versions of his favorite characters. We are currently waiting on an order of extra Shrinky Dink material to make more.
Ash Ketchum, pokeball, Dragonair, Pikachu, Sandshrew, Snivy, and Sewaddle. (I think.)

For Avery, who very much loves Frozen, I traced an Olaf. We added a hole towards the top, and once it was colored and shrunk, we made it into a piece of jewelry.
Before
After

Knitting: Children's Circlet (crown)

Miss Avery requested a knitted crown and I was lucky to find this free pattern called Circlet by Dani Sunshine. It was a super easy pattern once I learned how to MB*.

*Make bobble - k1, k1tbl, k1, k1tbl, k1 (all into 1 st), turn work, slip 1, knit 4, pass the 2nd, 3rd, 4th, and 5th st over the first st on right hand needle (1 st remains). 

Sunday, March 02, 2014

Crafts: Valentine crayon decorations

Hen wasn't able to celebrate Valentine's Day at school but that didn't stop us from having a special day at home. A few weeks before, Hen and I made melted crayon hearts, an idea I got after borrowing Martha Stewart's Handmade Holiday Crafts from the library. These definitely require parental involvement as a hot iron is needed to melt the crayons. I also used a Microplane grater after determining that the crayon sharpener took too long to get the needed shavings for the project. (And I did end up grating a bit off the old finger - whoops.)

To do this project you need the following:
wax paper
parchment paper
iron
ironing board (or other appropriate surface for ironing)
crayons (grated or shaved)

1. Grate the crayons - I highly recommend making individual piles of each color.
2. Cut off a piece of wax paper - 12"x12" is a good size.
3. Fold the wax paper in half and open it again.
4. Sprinkle a light layer of shaved/grated crayons pieces on one side of the wax paper, staying clear of the edges.
5. Fold the wax paper in half again and fold all the edges closed. (1/2 to 3/4 of an inch is good.)
6. Place wax paper between two pieces of parchment paper to prevent wax from melting and sticking onto the ironing board (or whatever surface you're using to iron the item on) and the iron.
7. Run the iron across the parchment paper until the crayon has melted.
8. Hang wax paper to cool and then cut into desired shape.


This was a lot of fun and they look very cool. One note, if you decide to make these for yourself, if the crayon shavings/gratings aren't equally distributed, the item will lean to whatever side is heavier should you choose to hang them. (See orange heart in the third picture from the top.) I plan on making clover leaves for St. Patrick's Day next month.

Friday, September 27, 2013

HP Party - From condo to castle

Darr thinks I've reached a whole new level of crazy. Yeah, right, like turning parts of the condo into a castle make me crazy.


Thursday, September 05, 2013

HP Party - Owls

Each kid who comes to the party will get their very own owl for carrying messages to family and friends when at school. Hen and I hit Fabric Depot about a week ago and agreed on two different flannel materials to use for said owls. I used the Silhouette machine Megan gave me when she bought the fancier one to cut out an owl to use as my pattern. We are talking the most minimalist owl you have ever seen. I still haven't figured out the beak (felt, maybe?) so Hen's Hedwig is currently without one but I'll figure it out and promise all owls will be as complete as I intend them to be.

2 pieces of 1/4 yd cotton flannel in different patterns, one owl cutout to use as pattern, corresponding thread

I traced the owl on the material and pinned it with the right sides together.

I cut out the owl and sewed the pieces together using a 1/4"  seam allowance and leaving a hole at the bottom.

I turned it inside out so right sides were showing. Note: The hole I left at the bottom should have been larger.

I stuffed the owl.

I added the eyes. I made two attempts at adding the beak using leftover material from previous projects but was unhappy with both. I will figure this out. Oh, yes, I will.

Knitting: Sweater vest

It's brown. It's a sweater vest. What more can I say?


Thursday, August 29, 2013

Party prep for birthday 6.0 - Creating Honeydukes

I'm working my way through Pinterest's Harry Potter birthday party ideas, but am starting to accept that I won't be able to use them all. The party would end up lasting 17 hours if I did, and that is far too long for a group of five and six year kids. For my will-be-turning six years old boy, there are a few things I'm focusing on:

  • Platform 9 3/4 - which won't take much since it's just the front door
  • The Great Hall - where the eating and birthday singing will take place
  • Potions class - the kids will do a minimum of two Potions-inspired projects
  • Honeydukes - a visit here before the end will have the kids "buying" sugary treats before they depart
  • The Gryffindor boys' dorm - where the kids can go for story time
I did not come across this specific idea, hence, the write-up I'm blogging right now. I saw this cardboard market from IKEA (see pic at right) the other day when walking through with Hen and thought that it was a good place to start. A market could just as easily be a candy shop, right? With a little work, though, I could make it more, well, authentic seems the wrong choice, but perhaps more appropriately styled for our party? Yeah, that's it. I bought the cardboard for $14.99, brought it home, put it together, and spent the rest of the afternoon helping my son raid our candy drawer so he could get this candy shop up and running. 

Today, I worked on turning it into Honeydukes. It isn't complete but I made significant progress. First, a trip to Home Depot was in order. Here's what I got: 
  • package of utility sponges, large brick size $2.49
  • 3 - 8oz samples of Behr matte paint in two complementary gray colors* $8.82
  • handi painter $1.97 (for thin application of paint)
  • 9' x 12' plastic drop cloth $1.98
Total: $15.26 

Grand Total: $30.25

I probably picked the most humid day of the year to give this a whirl. If you have the chance to wait until a less humid day, do that. 

Step 1 - I began the process by dismantling the cardboard market into pieces and laying them down on the drop cloth. I then used the handi painter to apply the coat of light gray for the mortar on the two walls and the roof. Note: I brushed paint onto the handi painter instead of dipping it into the paint to ensure as little paint as possible was being put on the cardboard to try and prevent bowing. Let the pieces dry before moving on. 


Step 2 - I poured a bit of the dark paint into a paint tray, dipped the sponge in, ran the sponge across the ridges in the tray to reduce the amount of paint on it, and pressed it onto the cardboard. Repeat, over and over and over again. Repeat one last time for good measure. Note: I staggered the brick placement at the beginning of each row. Also, I created the row with the initial pass, then rotated the sponge 180˚ and went back over each brick with the paint on the sponge. Be careful not to press too hard or you risk damaging the cardboard or applying too much paint. Let the pieces dry before moving on.

Step 3 - Once dry, I put all the pieces together, got candy, and took pictures.

Step 4 - I then hired a candy store attendant who was all to happy to try snot-flavored Bertie Bott's Every Flavor Beans.

I decided not to paint the front panel with the green and white stripes since Honeydukes has green on its storefront windows. I painted the counter dark gray, and the shelves light gray on the wrong side.

Things left to do to complete our Honeydukes store:
  • create and hang the Honeydukes sign
  • get and/or make more candy
  • purchase jars for candy storage
  • print sale sign for front of store


*I bought two samples of the lighter underlying color (i.e. mortar) and one sample of the darker brick color. I only used two samples and the brick ended up using more paint.

Monday, July 29, 2013

Projects: Soccer goal


I borrowed Fun Family Projects from the library on a whim and today we actually managed to make the soccer goal. The boys thought the hacksaw was awesome but the project took far too long to complete to hold their interest. While they were running around outside constructing toy guns out of the PVC pipe, elbows, and tees, I measured, glued, and tied the net down. Methinks the folks at Home Deport steered me wrong on the netting and zip ties, though, as the first kick caused two zip ties to come off and the netting to rip. The search for new netting commences but overall I'm happy with the instructions and the end result. Once new netting is attached, it'll be one hardy soccer goal. Of course there were pictures...


supplies

hacksaw, perhaps the best part of the project as far as the boys were concerned

popsicle break

finished product

play!

play, part two!

works inside and out

Monday, July 22, 2013

Christmas project underway

My sister is a fan of posting these daily reminders on Facebook of just how fast Christmas is approaching - for those interested it's 155 days away - so I decided I'd best start a couple of my projects. While walking by Paper Source I was inspired and with the little man's help we got farther down the road to having a finished product for under the tree.